The saga of the stocks continues with a frantic couple of evening’s work to get Vic’s stock ready for clear-coating on Friday (weather permitting). It is a bit of a mission juggling the painting around work. I manage to g. If the weather holds for Friday, I might need to take a day off (or at least a long lunchtime) as it will be the last chance for the next 10 days as rain is forecast.
I last left off in Part Two with a beautifully primed stock almost ready for paint.

Step 10
I need to give the primer some tooth for the airbrush paint to stick to. As it has such a nice finish, I do not need to aggressively sand it like I did with the original primer. I use a scotch pad to scuff the primer and remove all the sheen.
Step 11
I grab my white airbrush paint and my Badger Patriot airbrush and I base coat the stock. I wish RALI had had white etch primer in stock as it would have made my life a LOT easier here. Dark grey is not fun to paint over with white. The Badger Patriot is a wonderful airbrush for doing large areas like this it has good coverage and smooth atomisation. I use E’TAC opaque white mixed with Trident transparent base which improves the flow of the E’TAC white. Unfortunately I forgot to take a photo of this stage 🙁
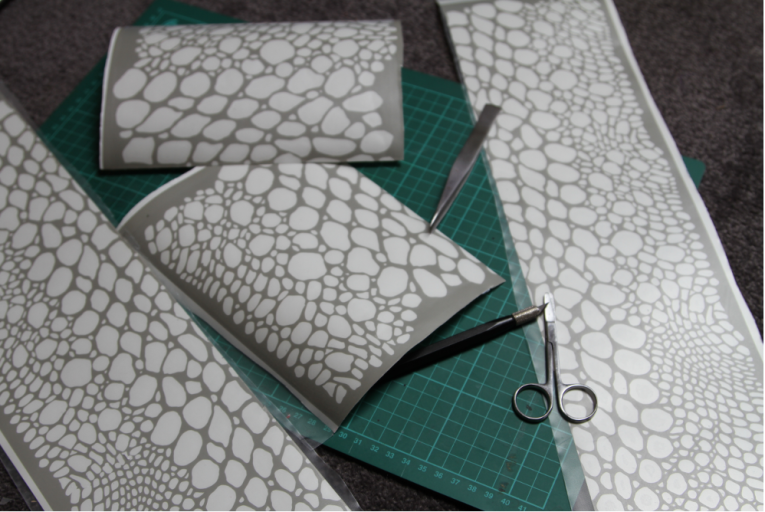
Step 12
Masking! Again! This is very exciting masking… It is the masking for the final design on the stock. I have decided to render stylised reptile/dragon skin for both our stocks and I am not hugely keen to attempt it freehand as it is quite intricate and needs to be crisp. Hand-cutting the masking is not an option as it would take forever. Luckily Russ Allen at INSANE Custom Stencils hooked me up with a gorgeous dragon skin pattern and once again, Dave at Signs of Success sorted me out with some custom-cut masking vinyl. Thanks guys!
My next job is to weed out all the vinyl in the mask that I do not need… Here is a photo of a half finished stencil. You can see where I have weeded and where I haven’t. It is a fiddly job.

The weeded stencils ready for applying to the stock. These have transfer tape applied to them. This makes it very easy to apply the masking to the substrate; it basically holds the stencil together as it is applied.

I apply the custom masking to the stock and then, because I am applying a flat, square stencil to a curly surface, I have to add and remove bits of stencil and tape up any gaps that I do not want painted. Masking is an art in itself and one that I am very practised at! The gloves are so I don’t spread oil and grease from my hands to the stock.

Aaaand… The fully masked stock! It took a wee bit of a beating during masking and some of the very fresh paint is chipped – Trident paint is amazing in that you can mask on it almost immediately, but it is still very fragile until it properly cures in 24-ish hours (and then it is like rock!)…
I think it already looks great with just the masking… And yep! that is a mug of pink fizzy wine! I am all class whilst painting!

Step 13
This is it… Airbrushing!
There is actually not much I can say here as it is something I do mostly by feel. The big thing is to go very lightly with the first few coats to reduce bleeding under the masking.
The paints that I am using are: E’TAC, Schminke, Trident and Auto-Air – All extended with Trident transparent base (because no paint behaves itself quite like Trident!). I am also mixing my own colours with some powder pigments from Solar Colour Dust and Trident base. I am using my Badger Patriot and my Badger SOTAR 20/20 (pictured). Look at the concentration!


Step 14
I changed my mind about the colours halfway through… I am going for subtle. Here is the painted stock ready to unmask… Hard to take a photo of because of the pearl effect.

I can’t wait to see what it looks like unmasked! With touch ups later this evening, It should be cured enough to clear on Friday if the weather holds! Fingers crossed!
2 responses to “Painting our Stocks (Part 3 – Airbrushing Vic’s Stock!)”
Looking good, the app tape worked OK then?
Thanks! The app tape worked perfectly! Such an easy system to use!