
The Dilemma
So as you all probably know by now, we will both be shooting at the Australian Queens in June with myself also being reserve for the NRANZ Ladies team. If you didn’t know, you can find more about it here. As well as the normal preparation that this will require, we have discovered an important piece of information – the Australia NRA has a weight limit on rifles! 6.5kg is the maximum that a fully kitted-out rifle may weigh. This includes sights, handstops, mirage bands, lenses… EVERYTHING! The penalty is forfeiting one point per range which would quickly add up over a week of shooting.
As we both have very heavy cast-aluminium stocks, we had a little panic which led to some frantic rifle-weighing.
Using our super (in)accurate bathroom scales, we discovered that Jared’s rifle is 6.4kgs and my own rifle (with a much chunkier 30″ Palma-style barrel) weighs a whopping 6.9kgs! Seems like my rifle might need to lose some weight and I have a feeling that a healthy diet and daily exercise won’t quite cut it!
The biggest problem is that there is not much to my rifle. It consists of an action, barrel, trigger, stock, sights and not many opportunities to shed half a kilo.
The Brainstorm
So we did what seemed natural – we had a couple of beers, jumped in the spa, had a not-so-serious discussion about life in general and came up with the following possibilities.
- Whack a couple of inches off the barrel. To be honest, I don’t think that I would have much of a problem with this at all. Con: This would need to be done by a gunsmith (More time that my rifle is away… not ideal…)
- Make some holes in the stock or get NF to do it. There is probably a lot of aluminium that could be removed without effecting the structural integrity of the stock. This is a drastic and permanent thing to do to our lovely new sexy stocks just to shoot in Australia (and Bisley eventually)!
- Get lighter components for the stock – Basically, all the removable bits – cheek-piece, buttplate, handstop etc…
- Get a fluted barrel… um… maybe not since the barrel is BRAND NEW!
- Strip the paint off (probably around 200 grams worth but… not cool…)
- Break their scales (Only considered in jest!)
- Cheat (Not an option… EVER!)
Of all the options, lighter components seemed to be the best choice. All the components are currently cast-aluminium so are quite heavy. It is also something we can do ourselves without involving a professional and if it doesn’t work, or if it breaks, I can just swap-in the original components. Another advantage is that the small components should be fairly inexpensive to produce depending on how we choose to do it.
Jared’s first instinct was to get some Teflon and machine a new sliding cheekpiece. I pointed out that the buttplate weighs four times as much as the cheekpiece so targeting the buttplate might be a better way to shed a large chunk of ballast. At a guess the buttplate would weigh around 500-600 grams so there is plenty of room for down-sizing!
Plastic was the obvious option for the construction of my new buttplate. It is lightweight and, with the correct design, will be very strong.
The Solution
Some warm and floaty three-ay-em introspection accompanied by the peaceful harmony of feline snoring (does anyone else have a cat that snores?) led me to a solution. I considered welding plastic sheet (which I don’t know how to do), making a mould of my current butt-plate and then casting it in plastic or resin (which I DO know how to do but quite frankly, I do not have the time or equipment for that!) and 3d printing (which I know nothing about but it sounds very tidy and suitably geeky!). Whichever method would be used, an idea evolved in my mind – strong and very simple!
Luckily one of our friends has a 3d printer. After a few quick facebook messages, I was ready to start designing. Originally, I wasn’t even going to think about this until after nationals, but whenever I get a new creative project under my skin, nothing stops me! Here is a photo of the beast… Thanks Matt Culver for the photo and the use of your printer!

The Design
I used Google Sketch-up for the design which was a huge learning curve as I have never done any 3d designing before but after four progressively blasphemous hours, I had something that I was vaguely satisfied with. As I am pretty happy with my current shooting position, I modeled it off my existing buttplate but I sacrificed the adjustability for rigidity and hopefully, durability! I made sure that it can adjust up and down but apart from that, it is shaped to fit my shoulder.
Currently my design looks a little bit like a Lego brick but I think I have all the measurements and angles correct! Beautification will be a consideration for the future – I will make sure it works first.


I emailed the design through to Matt and although he was a little confused about the shape of it, we agreed on a price (18 metres of plastic filament worth!) and got the process started. I headed off to the range to continue the tedious process of running in my new barrel..
The Prototype
By the time I returned, a low resolution prototype of my buttplate was almost ready after 3+ hours of printing time. I am very pleased with the initial results. Side-by-side with my current buttplate, I think I got it spot on! I made it slightly narrower on purpose as my current one is a little wide for my small shoulders. I also made it a little less deep to conform with the 20mm-deep regulations.
Here it is… It is quite ugly but it seems to be very strong and it is very light! It does not look it in the photos but it is actually a lot smaller than my current buttplate.


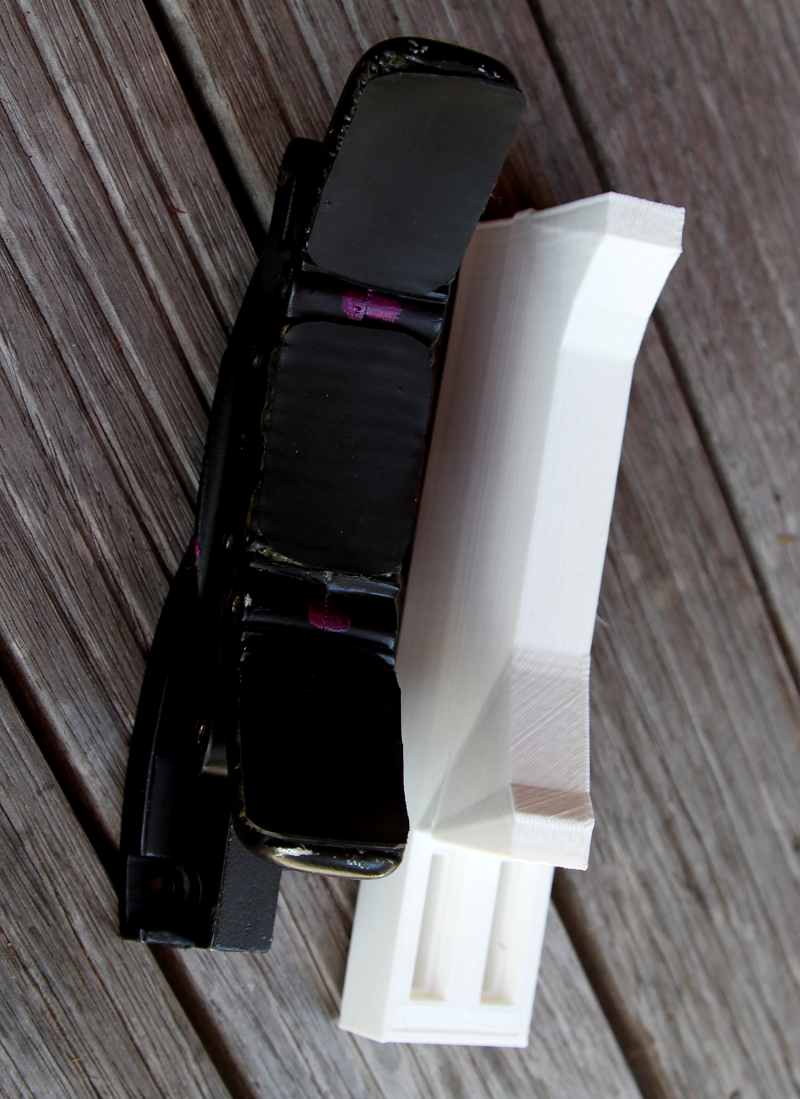

Here it is on the rifle:


And here is a short video of me shooting with it (with some very strange-sounding slo-mo at the end!):
The Verdict:
- It is very sturdy and VERY comfortable.
- It is a lot shorter than my current buttplate. So short in fact, that I have maxed out the extension on my rifle and it still needs to be longer! This can be fixed.
- It is very slippery and slides out of my shoulder. This is easily fixed by gluing some rubber onto it (I will try it out tomorrow and report back)
- The slots for the bolts need to be narrower. I left them generously large (6mm) but 5mm would be better for the 5mm bolts! Washers will fix this in the meantime.
- Rounding the corners. I couldn’t figure out how to do this in Sketchup (I just filed them down) but Matt has pointed me in the direction of a program that will make it easier.
- A little bit of styling. This would be entirely for looks but may have the advantage of saving a few grams!
All in all, I think that this is actually going to work! Durability does not seem to be an issue (I may look into possibly shrink-wrapping it to help hold it together), I just need to fine-tune the design a little!


Nice one Vic,
Wait till you see my new sexy 3D printed RED pitol grip to go with my blue tube Elisio!!!
Oooooh! When will we get to see that?
Forgot. Take out the aluminium under the barrel. Milling it out until the foreend is only about 2mm thick including the bottom will help to rebalance the rifle. I suspect it is now quite front heavy????? If you are underweight with the buttplate an alternative is to add lead as far forward as possible up to the maximum weight to help rebalance.
I am not sure how unbalanced it is yet as it is a little short for me with the lighter buttplate… It seemed to feel quite nice though.
Was thinking about removing the very top of the stock around the barrel (down until the bottom of the slots…) It seems a rather unnecessary part of the stock – I don’t think it structural… It there any reason why I shouldn’t?
I thought that the rifle would be very front-heavy with the longer barrel but it seems there is so much weight around the throat that it hasn’t affected the balance (probably slightly improved it if anything!).
Hay there hotloaded how you going?
Was thinking if you had thought of the option of using lighter than air gas balloons to help lighten things up?
If you needed to cut down .4kg (.6kg to be on the safe side) you will only need a balloon of .539.08 m3 using the following calculation;
Buoyant mass = mass * (1 – (α / µ))
Buoyant mass = 0.1786 g * (1 – (1.292 / 0.1786)) = -1.113 g of lift per litre of helium = 600g / 1.113 = 539L = .539.08m3
Air (α) = 1.292 (g/L).
Helium (µ) = 0.1786 g/L
As in all things there pros and cons;
PROs
Achieve the weight limit.
With a long stirring it will be easer to find your rifle in a crowd.
Firing line wind meter.
More of a party atmosphere on the firing line.
Somewhere to put the sponsor’s logo.
CONs
Atmospheric changes, hotter it gets the more lift.
Having to stop people from stealing you balloon.
The constant desire to use the gas to make your voice funny.
Anyway the rifles looking good and congrads on the first of many silver ferns I will see you two on the range during the national’s. Sorry about the math it’s a slow night at work for a change.
steve.
I love it! Thanks for the giggle 😀